Add your assortment to start selling. This can be done manually or automatically. You don’t have to fill in all the fields in the cards, but it’s advisable not to neglect the essential ones.
Managing assortment (adding items, inventory management etc)
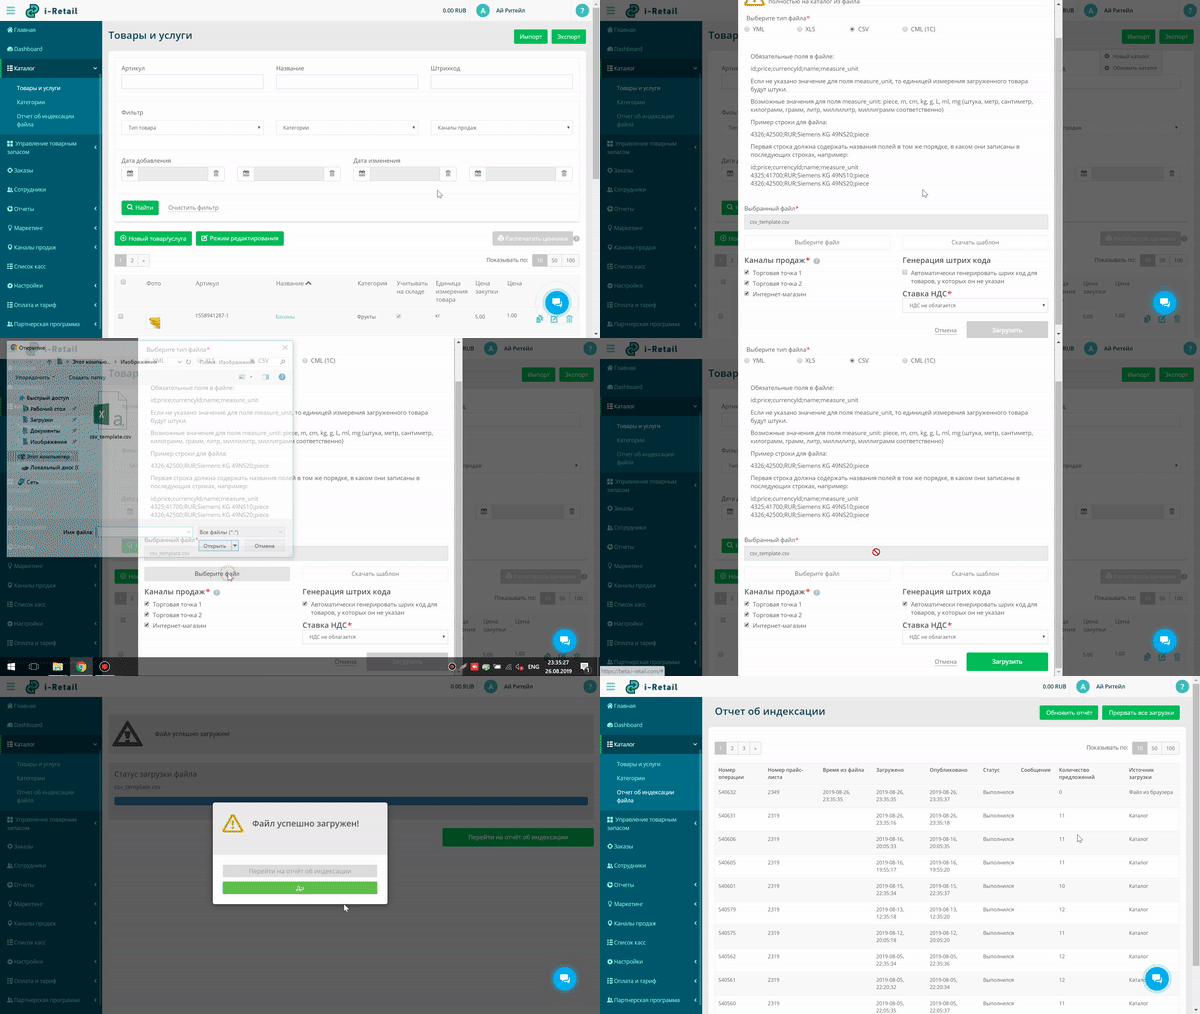
All information about catalog operations can be viewed in the “Report of file indexing” menu. If an operation has an “Achieved” status, it means the import or export was successful without errors.
After creating an account in the personal dashboard, aт assortment will be automatically generated for you. If needed, you can make changes to the assortment – add new categories, and products, or edit existing ones.
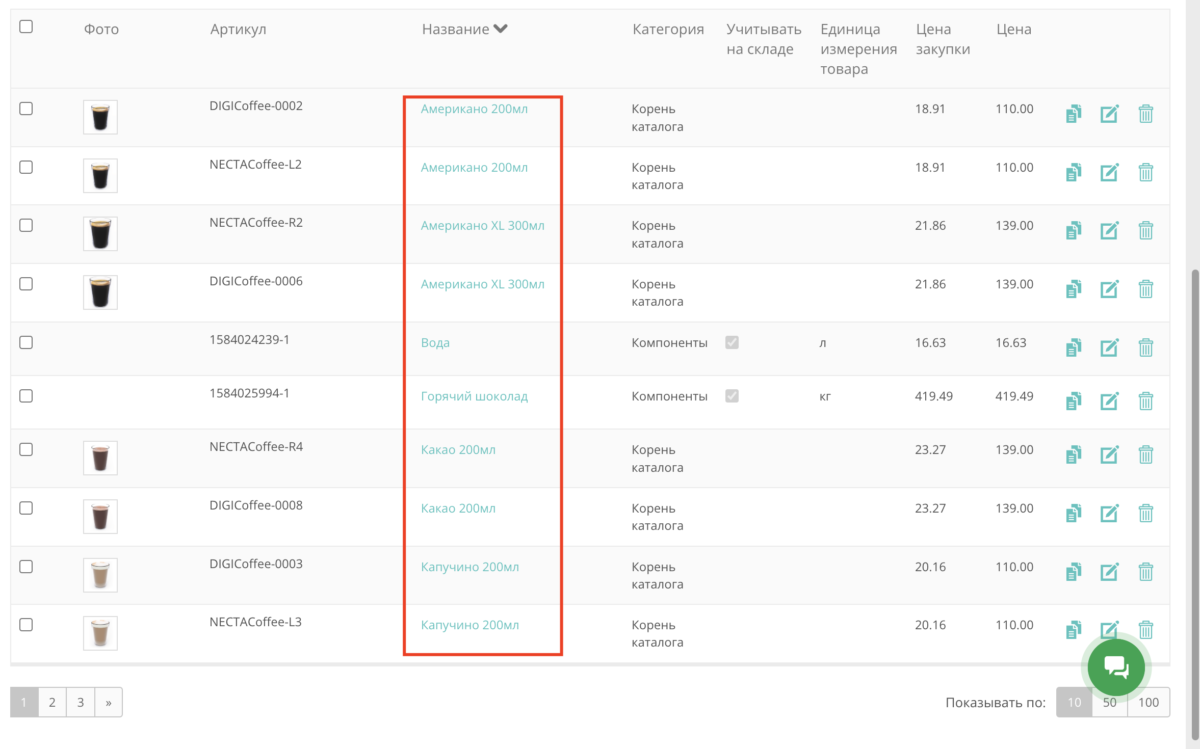
To make changes, go to the ‘Catalog’ menu, and then to the ‘Goods and Services’ section. Next, go to the settings of the product you want to adjust. To do this, either click on its name, which is highlighted in blue, or click on the edit button.”
Disabling Products and Changing Assortment Availability
If, for any reason, you need to disable products, you can do this in the personal dashboard.
In the product card under the “Sales Channels” block:
- To disable, uncheck the box next to the address of the point where you want to disable.
- To enable, check the box next to the address of the point where you want to enable.
After making changes, don’t forget to click “Save” and then confirm the changes with the “Yes” button in the pop-up window.
After saving the changes, the products will be enabled/disabled at the corner within 30 minutes. If the products have not disappeared from the menu on the coffee corner within this time, restart the software.
Changing the Cost of Products
If you decide to increase/decrease prices or temporarily reduce the cost as part of a promotion, adjust the amount in the “Base Price” field in the product card – this is the price visible to the customer.
After making changes, don’t forget to click “Save” and then confirm the changes with the “Yes” button in the pop-up window.
After saving the changes, the products will be enabled/disabled at the corner within 30 minutes. If the products have not disappeared from the menu on the coffee corner within this time, restart the software.
Adding categories and goods
You can also import the assortment via a file if you have a large number of items – this will save time. You can also seamlessly transfer the assortment from another platform to i-Retail.
To do an import, download all your product items from another platform in one of the formats supported by i-Retail (YML, XLS, CSV, and CML). Then, download the i-Retail assortment template, which is available when you click the “Import” button. Transfer your assortment into the i-Retail template. To ensure everything loads correctly, follow the structure and do not delete columns from the downloaded template.
Subsequent changes to the assortment can also be made through imports. To do this, click “Update Catalog.”
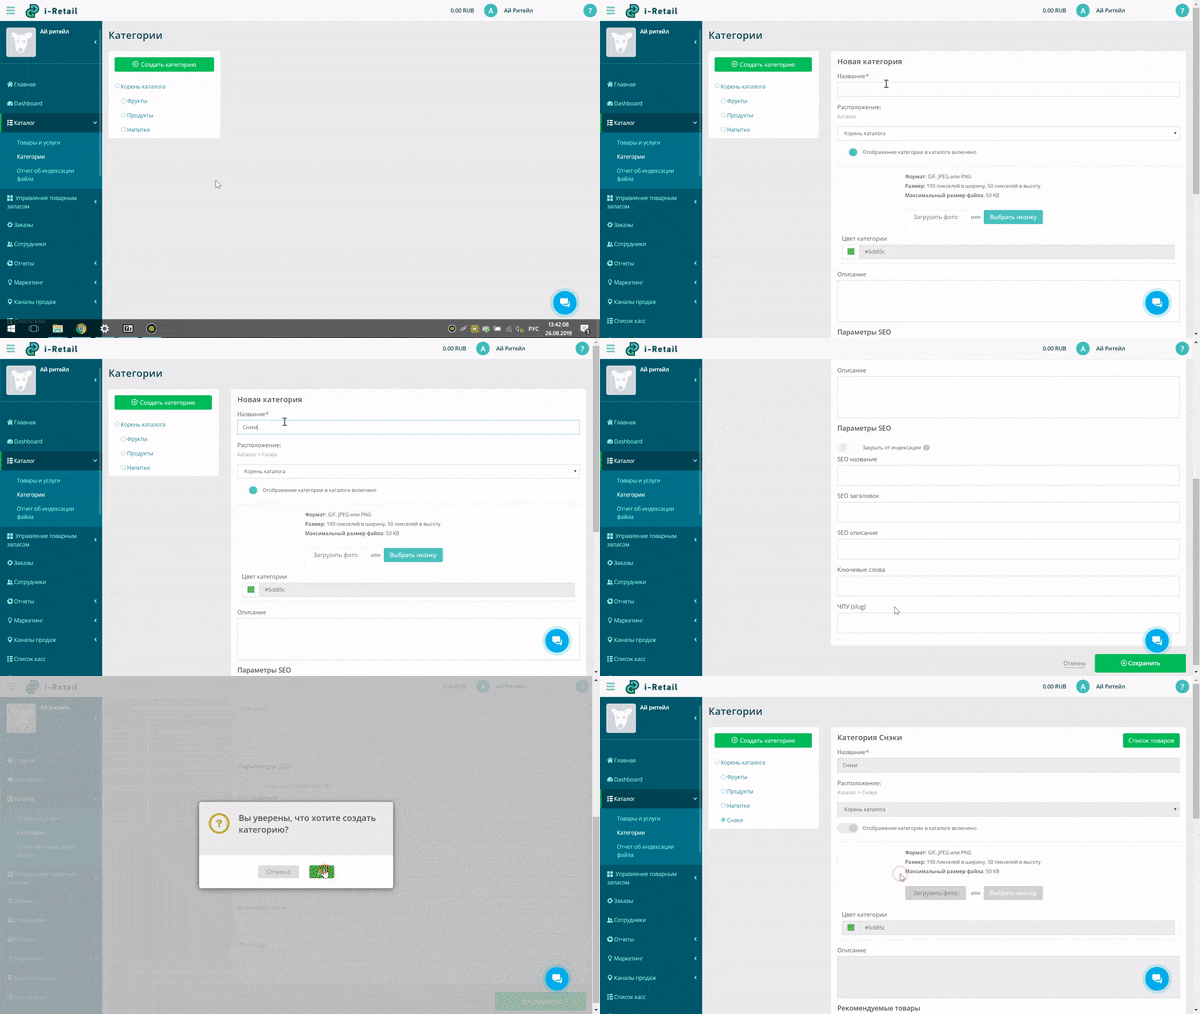
To manually add items, start by creating categories, and then add your products and services to them. You can also create products and services without categories, and they will be added to the root of the assortment catalog.
The first category is created at the root of the catalog. Subsequent categories can be created either at the root or inside another category (subcategory). By default, each category is displayed in all sales channels. To stop a category from being displayed in the online store or application, toggle the “Display category included in the catalog” option off.
Categories are created in the personal cabinet in the “Catalog” menu → “Categories” → “Create Category.”
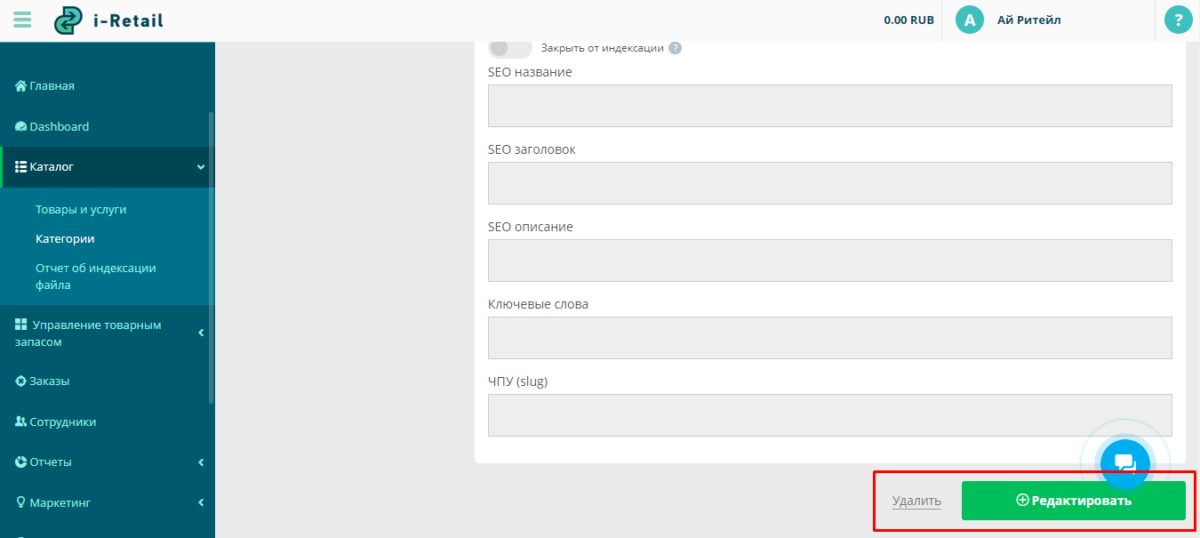
To edit already created categories, select the desired category in the “Categories” menu → click “Delete” or “Edit.”
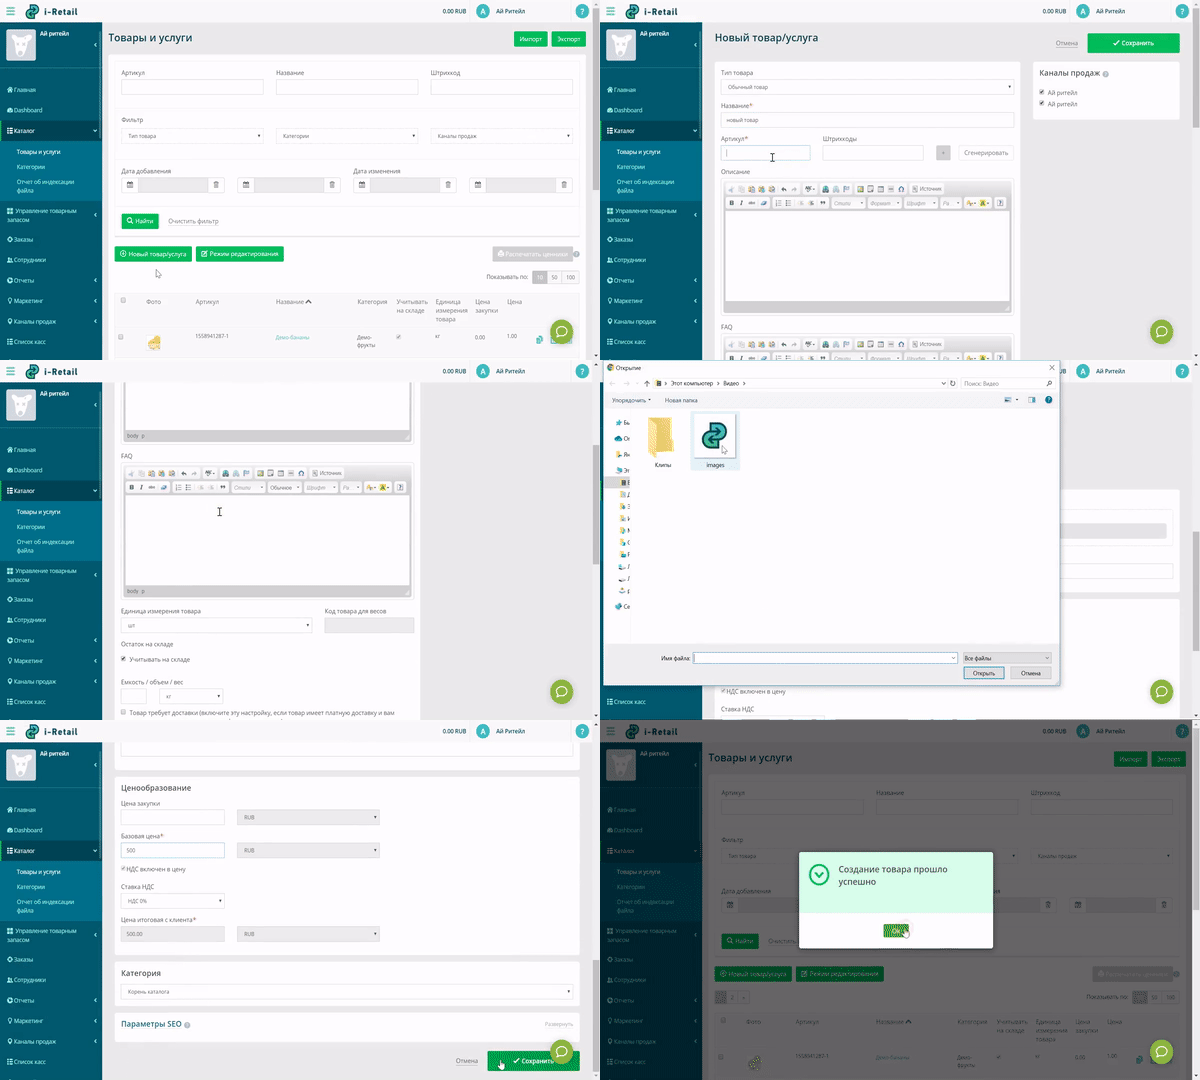
Products and services are created in the personal cabinet in the “Catalog” menu → “Products and Services” → “New Product/Service.”
This type of product is suitable for standard items such as a T-shirt, smartphone, juice pack, and chocolate bar. Choose this product type if you have a simple item without components.
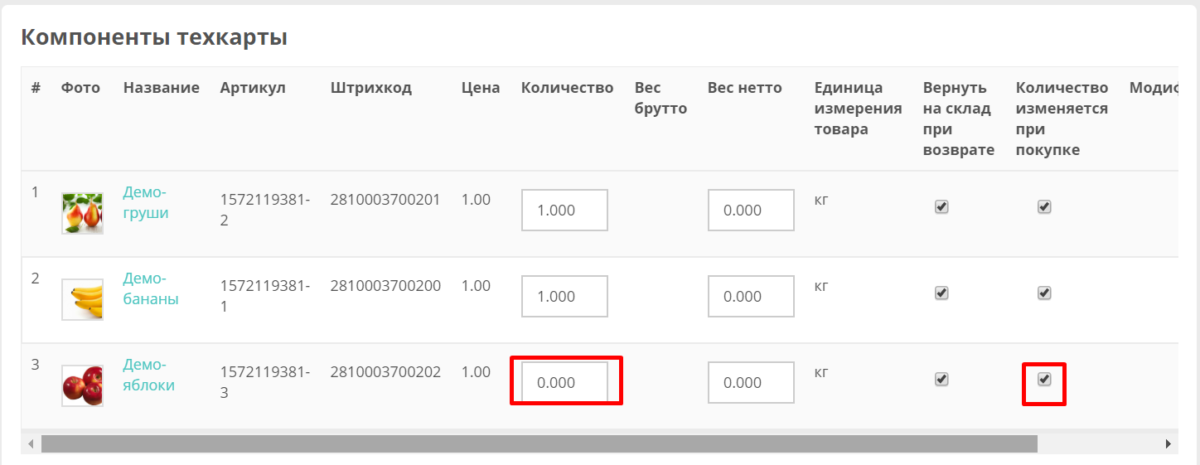
A technological card is used to create a composite product, which is a single item made up of multiple component products that are sold as a whole.
The best example is coffee, with components such as water, milk, coffee, cup, lid, and sugar.
Choose this product type if you have a single product listing consisting of multiple component items sold as a single unit
What else is important to know about this type of product:
- A composite product can have its own price, which does not necessarily need to be equal to the sum of the added component products.
- Working with a technical card cannot be done through file import and export; it must be done manually.
- When creating it, you can choose how it interacts with inventory management – whether the quantity of component products decreases after the sale and return of the composite product. In other words, whether the stock of component products decreases after the sale of the technical card.
- Technical cards can include components with modifiers. For example, a hamburger. To ensure that the cashier or self-service kiosk prompts the addition of French fries to the burger, it is recommended to add it as a composite variable item. This way, the option will be presented to the cashier or customer during purchase, and inventory management will be handled correctly.
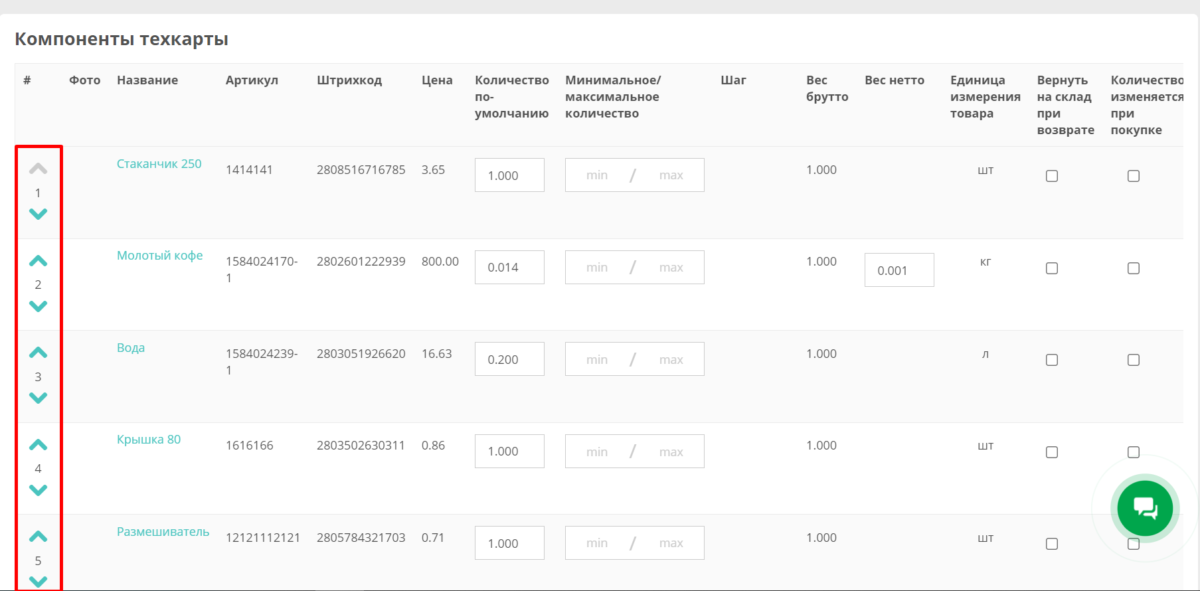
You can choose the order of component items to conveniently group similar positions in the technical card or display the most frequently changed parameters at the top.
To change the order, use the ‘down’ and ‘up’ arrows in the technical card.
- Sales Channels
Products can be set to be available in specific sales channels. For example, one product could be available only in one corner, and in the remaning ones it won’t be available. - Localization
You can provide descriptions, names, and FAQs in other languages so that the correct content is loaded when the language is switched in the application - Vendor code
It is a mandatory field that allows you to search for products in your personal cabinet and in cashier applications. - Description and FAQ
The editor supports various text formatting options and allows you to insert images via a link. In the description, you can write product specifications, while in the FAQ section, you can include cashier prompts or answers to frequently asked questions. For instance, for complex equipment, you can specify delivery times, dimensions, and power consumption. - Keep account of good in warehouse
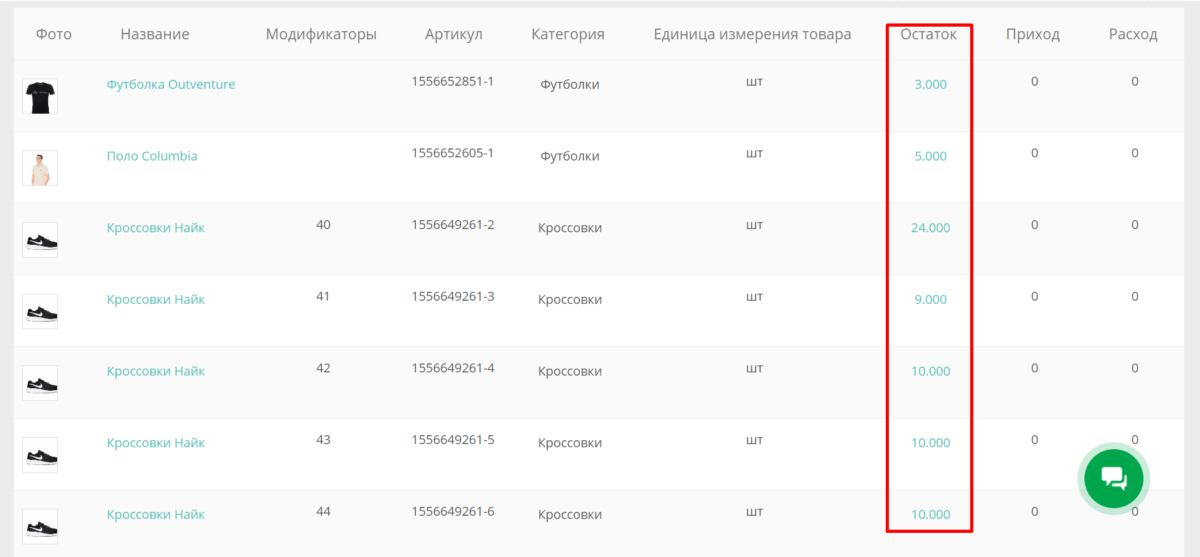
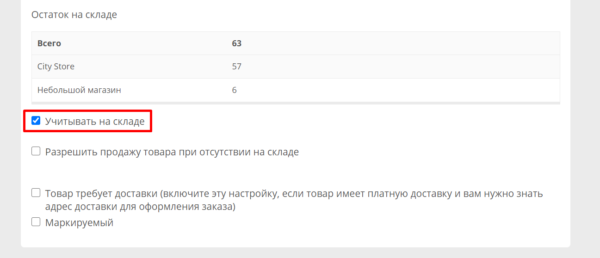
If this feature is enabled, you can manage inventory for each product, including receiving items in stock, checking item stock levels, and conducting inventory audits. - Allow the sale of goods in the absence of stock
By default, when inventory management is enabled, you cannot sell more items than you have in stock. To allow sales when an item is out of stock, you can enable this function. - Photos
Images attract attention. If you use an online store and/or self-service kiosk, consider adding several vibrant photos of the product. - Modifiers
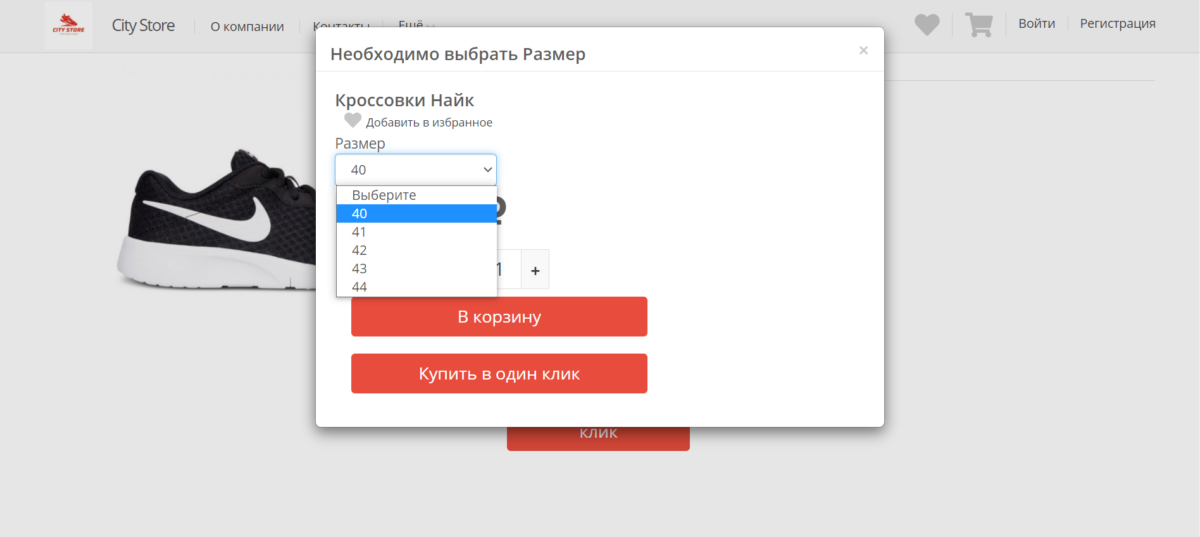
Modifiers allow you to create product variations. For example, for T-shirts of different sizes, you don’t need to create separate products; you can add sizes as modifiers, set prices, and assign unique vendor codes.
Editing the assortment
To make changes to your assortment, go to the “Catalog” menu and then select “Goods and Services.” Next, access the settings of the item you want to adjust. You can either click on its name, highlighted in blue, or click on the edit button.
If you want to increase or decrease prices or temporarily reduce prices for items during a promotion, you can adjust the amount in the “Base Price” field in the item’s card. This is the price visible to customers. If you need to make a specific item free for customers, you can set its price to zero.
After making changes, don’t forget to click “Save” and then confirm the changes by clicking “Yes” in the pop-up window.
If you are working with a file, upload the updated version to your personal cabinet, and the changes will be applied according to the updated data. Items that are not in the file will remain unchanged.
Assortment accounting
Acceptance offers
If you are keeping track of goods and maintaining inventory, you will need to process each new batch of inventory in your personal account upon receipt.
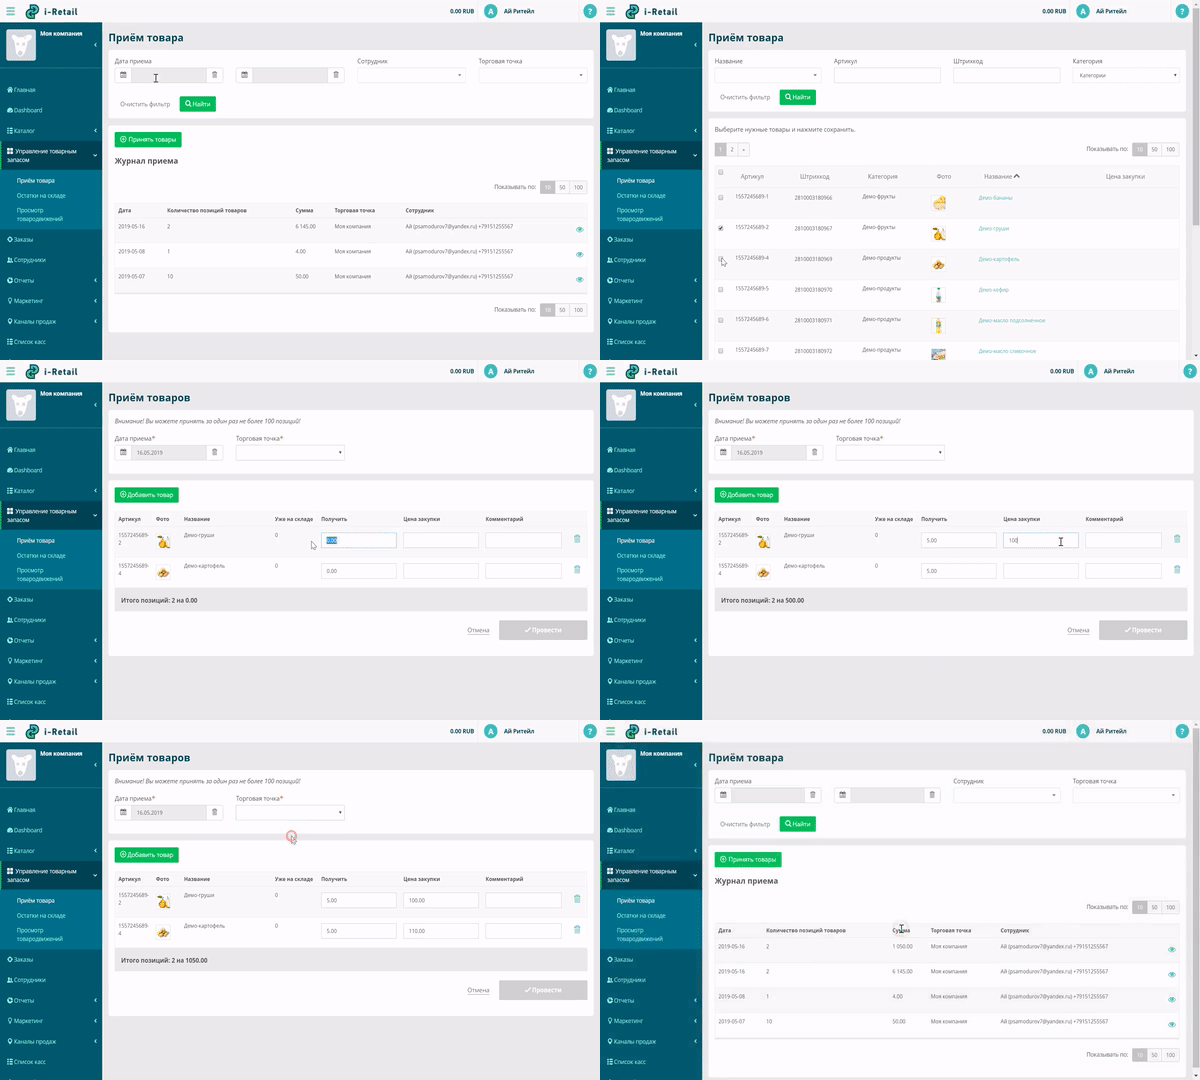
Receiving goods through the personal account is done in the “Inventory Management” menu → “Acceptance offers”
To receive goods, click on “Accept items” → select the sales channel → “Add offer” → choose the necessary items → specify their quantity, adjust the purchase price if necessary, and click “Save.”
You can only receive goods for items for which the “Track inventory” checkbox was selected during creation.
All operations related to receiving goods are displayed in the goods receipt journal in the “Acceptance offers” menu. For a quick search among past receipts, use the filter – by receipt date, by employee, by sales point.
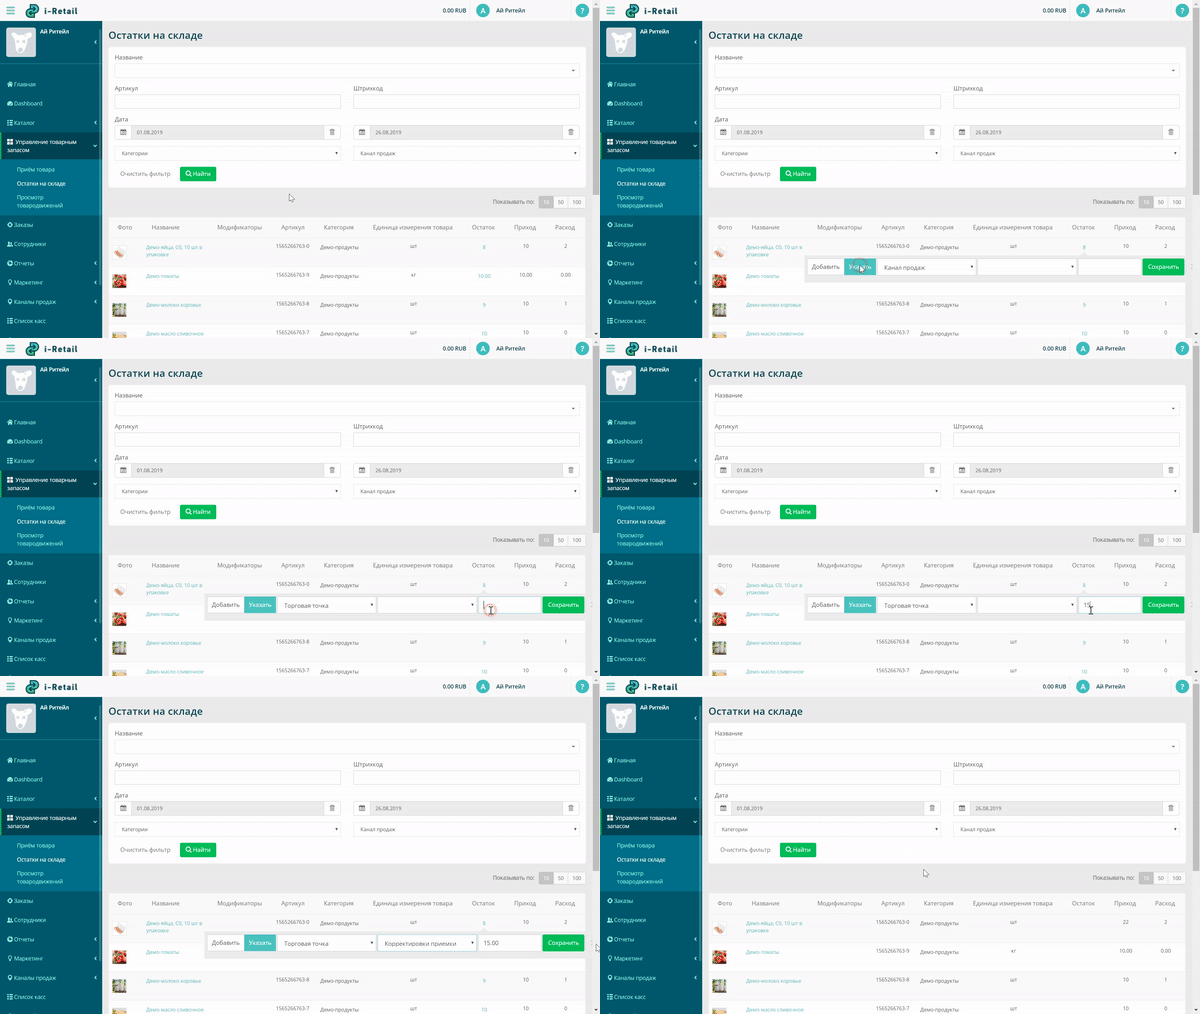
Inventory managment
- Acceptance correction
- Inventory
- Breakage
- Theft
- Loss of presentation
- Expired expiration date
- Tasting
- Mechanical damage
- Defect
- Return to the supplier
1. If you have just created this item, you may need to wait for some time before it appears in the sales point.
2. Check the availability of the product in the sales point. The checkbox for the product should be selected in the relevant sales point for the product to be visible.
3. If you are maintaining inventory, there should be a stock balance greater than in the personal dashboard.
![[Multi-Purpose] Header (EN) [Multi-Purpose] Header (EN)](https://help.i-retail.com/wp-content/uploads/2023/11/help-center-1.png)
